


Exposure & Dynamic Range
Last time we discussed composition; today we are going to delve into exposure and dynamic range. Exposure is one of the most important elements in creating a pleasing photograph, but it is also something that is getting really de-emphasized in today’s world of digital photography. Yet, our images don’t always turn out as planned. Today we are going to learn why, and how to fix these problems.
Exposure
We will save dynamic range for later in this post, but let’s define exposure now. In simple terms exposure is how much light has hit your image sensor to produce your photo image. But it’s much more.

While cameras are really very similar to our eyes in many way, in others they are very different. When we look at a scene, our eyes are automatically adjusting dozens of times a minute to make sure that we can see detail in what we are viewing. Our iris opens and closes in minute amounts to allow us to see detail in a very wide range of lighting conditions. But once that camera shutter is snapped, the light from your scene is “frozen” onto that image sensor. While the computer algorithms in our modern cameras are quite amazing, sometimes they do get fooled.
Too much light and your photo has big glaring white areas with no discernible detail. Too little light and you get that big black blob. And like the old story of the Three Bears, the right amount of light makes our photo just right.

How do we get that “right amount”? I could certainly get all technical here, and we could end up in a detailed discussion of the histogram on your camera. But, let’s keep this a bit more simple for folks who just want better travel or vacation photos.
First, the key to proper exposure is the same as the key to proper composition – look around, pay attention to the lighting and try different things. When you take that shot, if your image has too much white glares or black blobs, adjust the exposure settings on your camera to brighten or dim your image. Take another shot and keep adjusting until what you see on that screen more closely resembles what you saw when you were looking at your subject. Sometimes you’ll just need to shoot from a different angle to get the light to be “cooperative”.
Many cameras, and even some of our phones, have exposure compensation settings to adjust exposures. “+” means that the image will be brighter. So the more “+” you dial in, the brighter your image will be. Do this to get rid of those black blobs. “-” means less light hitting that image sensor, and you’ll get a darker photo. More “-” helps with those glaring white areas.
I mentioned a “histogram” above. Most good digital cameras will allow you to view your image along side a histogram. The histogram is just a graph showing how much light has hit your image sensor, and where that light was in relation to the top and bottom of your image sensor’s light range capability. Ideally for many photos (now I am really generalizing here; there are many, many exceptions), the top of the histogram graph (the tallest part) should be about in the center between the left and right sides of the graph. This just means that your image has very small areas of very bright or shadowy areas. If your camera has a histogram, play around with your exposures and see how that graph shape changes with more or less exposure. When you get experienced, you can “read” that histogram and mostly nail your exposures. But, the histogram is not necessary to get good exposures.
Like composition, exposure can be somewhat subjective. On my Nikon D500, I typically shoot most of my scenes with the exposure compensation setting at a minus 1/3 (-1/3). Why? I feel it slightly enriches the colors and helps take care of a lot of those annoying “blown out” highlights – white glaring spots.
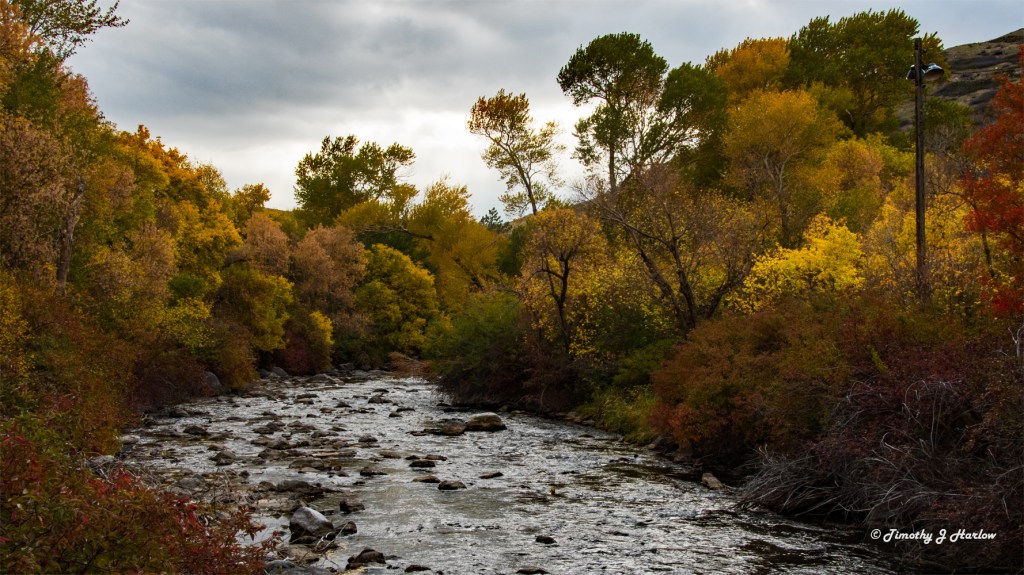
Notice that the brighter spots on the grasses above have color detail, but that they are still bright. Now look at the white parts of the clouds. There are a few small areas that are absolutely white, but most of the clouds still have some color and texture.
Now let’s focus on the darker areas of the photo. Even most of the shadows have some detail. (If you enlarge the photo, you’ll see more detail in the shadows.) Because we can see some good definition and detail in most of the photo, we can say that this image is properly exposed – not too bright or too dark.
So, remember that proper exposure is more about making your image feel right than anything else. Most pleasing photographs have detail and definition in most of the image. But, there are exceptions.
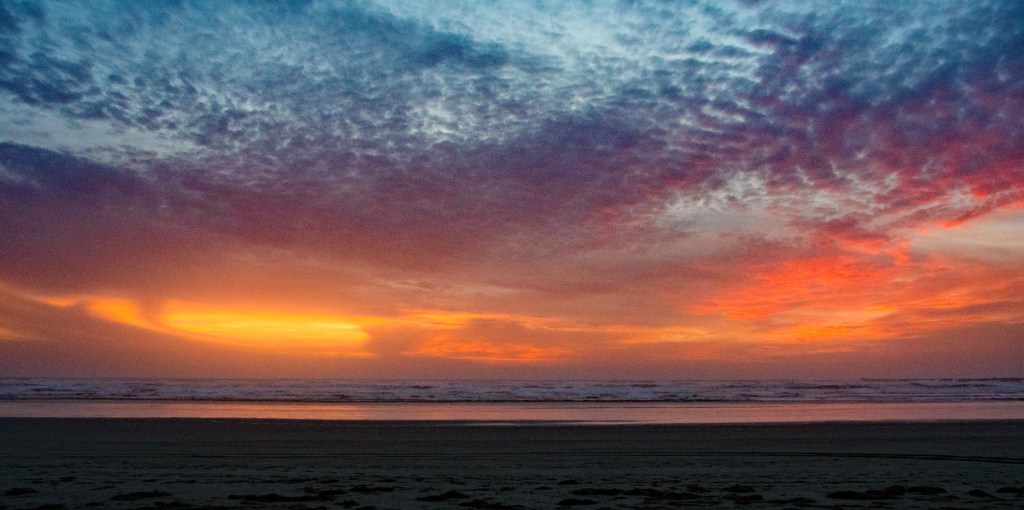
I purposely let the foreground in this photo go dark, almost black, because I wanted rich colors in the clouds. There is, however, still a whole range from white to black in this photo. To get those clouds right, I adjusted my exposure compensation down a bit. And going back to the previous post about composition, I really kept that ground angle small to emphasize my subject – the sunset.
For more insurance, take multiple images at various exposure settings. This is known as bracketing. You never quite know what’s “right” until you get back and start working with your images. I am a huge fan of bracketing as you just never know when you can go back and “re-take” that image. My motto is, “When in doubt, bracket.”
Dynamic Range
All camera image sensors have a range through which they can produce detailed and discernible images. This is dynamic range. This is a bit different than contrast. Contrast is the range of white to black, or light to dark in your actual photo, while dynamic range is the breadth of light that your image sensor can use to produce detail in the highlights and shadows, so that you don’t get those black blobs or glaring white spots.
Different cameras and different phones have different capabilities regarding their dynamic range. This is where you need to learn your equipment. My Nikon D500 can handle a lot bigger dynamic range shooting in RAW file mode than my phone, or even my Nikon P950.
So, when you are going to take that photo, pay a lot of attention to the lighting in your scene. If you are a total gear head, you can use that histogram to “read” the scene’s dynamic range and compare that to what your camera can handle.
Or… You can take a few minutes and really look at your scene. Is the sun shining into your view? Is your subject in a shadow with other parts of the scene in bright sunlight? Is the sun behind your subject?

This is why we photographers are always talking about “the light”. No matter what, if the dynamic range of the scene exceeds the dynamic range of your camera sensor, you will have nasty, blown out highlights, or black blobs in the shadows. (Your histogram will be “cut-off” at one end or the other.)
What can you do about this? Like before, take time, look around, try different angles, or even try coming back to the scene at a different time of day. (Not always possible.) Try to make sure you are shooting with the sun, not against it. Try to get your subject into the main light and not in a dark shadow. Sometimes you can use a flash to “fill in”, or brighten, the shadows (this could be the subject of another post). Try to let smaller, unimportant parts of your image go darker to keep the main parts properly exposed for detail.
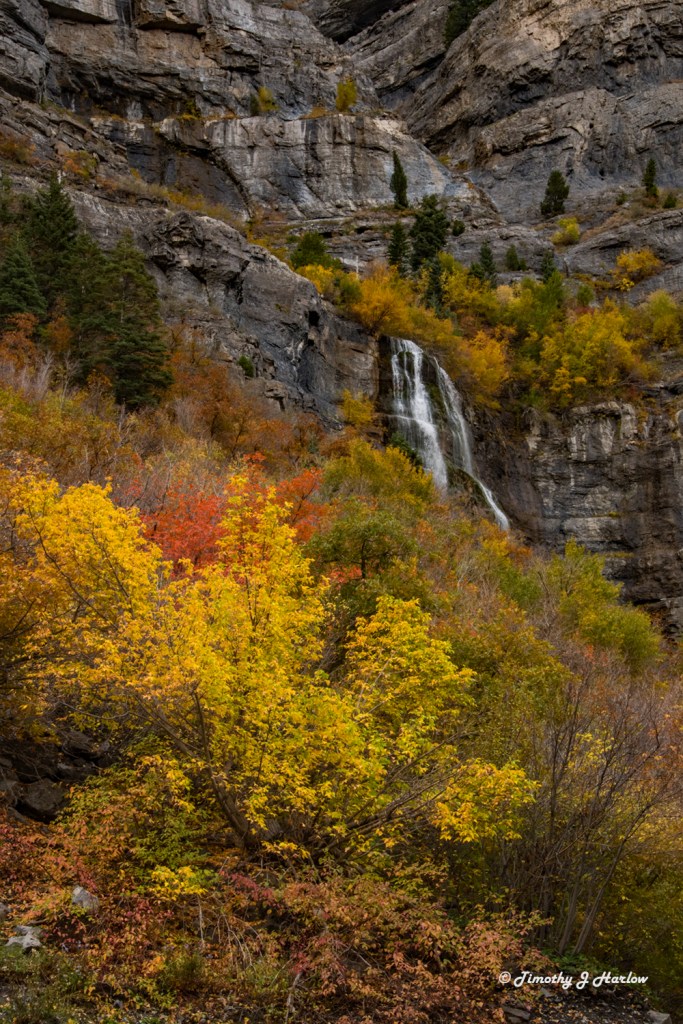
This view of Bridal Veil Falls on the Provo River is actually looking southwest – right into the sun when I took this photo. So, I used my zoom lens to crop out the sky, thus eliminating that much brighter sky from the view. I knew that the sky would end up stark white if I properly exposed the waterfall and foliage.

How did I manage to shoot into the sun in this photo, but still retain definition and detail in those clouds without the ground going too dark?
This is really knowing your equipment and experience. I used that histogram to my full advantage, but I also bracketed. And I shoot in RAW files as those can handle a significantly wider dynamic range than a JPEG image. I could not have made this shot with my phone or my Nikon P950. And I purposely let the background hills go a bit dark to keep detail in all but the brightest bits of those clouds. I also got lucky and shot this image when the sun was right behind that big cloud.
In conclusion, handling proper exposure and not exceeding your camera’s dynamic range is not overly difficult. The first rule is to take a good look around your scene. Use different angles to help control the lighting. Use composition to help as well. The second rule is to learn your equipment and know its limits. Third, bracket your shots. (I cannot emphasize this enough.) Be aware of the lighting and use it to your advantage. Just take your time and think about what you are seeing.
I really hope this has been helpful as no photo can be great without proper exposure. Hopefully the images were helpful in allowing you to visualize these ideas. This has been fun, and again I hope it has been useful.
Thanks for visiting my blog, and well, have the Happiest of Holidays! See you all next time.


One thought on “The Making of a Good Photograph – Part II”
Comments are closed.