


In response to a reader’s (Ben Macri – An American Stream) comments on one of my last posts, I have decided to describe how I use of photo editing software in my photography. I was quite glad that Ben had made that comment as it caused me to think about how I usually use the technology of today and whether or not that technology is improving my art.
What prompted this new post was a discussion that Ben and I were having on the technical aspects of photography versus the artistic aspects. Ben had mentioned that he had received advice from an old photographer one time who told him to simply go out and shoot what he saw and to stop worrying about all of the technical gadgetry of the day. Ben had posted this comment in response to some comments that I had made in my post, Unreal Views, as I had actually taken the original post down and redid it. I had not been happy with the quality of my photographs in that first version of the post.
With the digital age of photography firmly entrenched upon us now, there is a wide spectrum of ways to approach our craft. Some of us primarily use photography software much like we used our dark rooms, simply to adjust the qualities of a photograph so that the end product matches as closely as possible to what we originally saw when we snapped the shutter.
Others prefer to use the new software to expand the traditional photograph into more of an impressionistic art piece. I am not going to discuss the merits of one versus the other. The beauty of our craft is that we have the freedom to do whatever we like. In this post I want to discuss how I use the technology to enhance my art.


Whether we’re using a smart phone or a DSLR camera, the digital sensor processes an image almost exactly the way that film processes that image. The photons in what we term “light”, enter the lens and create various electronic signals on that sensor depending upon how many photons fall on each pixel. In film, the photons would “excite” the silver in the film emulsion in much the same way. Every camera manufacturer’s digital sensor processes those electronic signals in slightly different ways, just as different film brands used to give us slightly different photo qualities.
When we used film, we could alter the images that we were seeing either by how we processed the film itself and/or by how we processed the print that we produced on the photo paper in the enlarger.
In my view, this is really no different from what I do when I process my image in digital software. (I am currently using Elements, a slightly watered-down version of Adobe Photoshop.) As I pretty much use my digital processing software like a dark room, this suits my purposes just fine.

I learned to shoot, process film and make prints many years before digital photography was ever on the scene. As I mentioned to Ben, I used to shoot slide film almost exclusively for many years. To get a good quality slide, I had to nail my exposure, range of light and composition when I took the photo. (I also used to bracket my exposures to help ensure a perfect slide. I still sometimes bracket to ensure that I get adequate details in the shadows and highlights if the lighting situation is tough.)
When we’re going to shoot a photograph, our eyes automatically adjust almost instantly as we scan our scene between the shadows and highlights. In our brain we can see pretty much full detail across a very broad spectrum of tonal range from the darkest shadows to the brightest highlights. But, the camera’s digital sensor has a limited range in which it can process detail from light to dark. The newer digital sensors have a much broader range in which they can process detail than film ever had. You may be familiar with the term “HDR”, which means high dynamic range. This simply refers to the broader range through which the digital sensor can process detail in an image across the spectrum of white to black.

In many photographs, we normally want to see a broad spectrum of tones ranging from a pure black with no detail in a shadow all the way to a small amount of pure white with no detail in a small highlight. However, for the photograph to look “normal” the majority of the scene should usually show a lot of detail all the way from the darker parts of the shadows to the lighter highlights like clouds and things like that. When we have taken a photograph and viewing this shot on our monitor or camera view screen, and we don’t see a little bit of pure black or pure white, the scene tends to look rather flat, or blah. And because the new digital sensors have such a high dynamic range, many photographs are taken in a type of light where there just is not enough contrast to produce any pure black or pure white. So how would we fix this?
That’s where the digital processing software comes into play. In the software we can adjust the contrast range of the image to help ensure that we see the full spectrum of tones all the way from black to white. You will be able to tell when you get it right as the photograph will be more pleasing to your eye. It should have some “pop”. We could get all technical and talk about contrast curves and color curves and all of that, but that’s going to be too much for this article. Once you have manipulated the contrast of the shot in your software, you may now have a photograph that is quite technically correct. You should have a small portion (at least) of the photograph that is completely black. And there should be at least a very small portion of the photograph in which any color is so bright that it appears as pure white. And everything else in between should either be shades of gray or colors. That is a technically correct image.


However, we always need to ask ourselves a very simple question, “does this image look like what I was seeing when I took the photograph?” Sometimes, the answer will be yes. But there are other times when you can have a technically correct image which does not look at all like what you were trying to convey when you took the photograph. Just look at the above examples. If you are making an image near sunset or sunrise, you will very likely have a much larger portion of extremely dark shadows with a much smaller portion of the photograph being recorded in visible colors or discernible shades of gray. If you have “adjusted” your image in the digital software to have a fairly even curve and distribution of lights to darks, you may very well find out that this image does not look anything like what you took. This is where the art must always override the science.
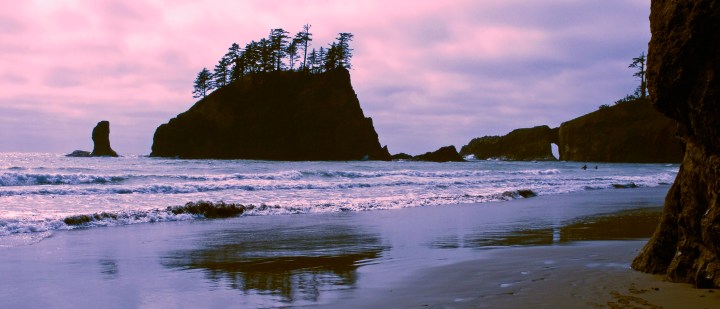
I shot the above image in Washington state in the Olympic National Park a few years ago. This is not a really technically correct image in that it lacks detail in large portions of the shadows. However, this is a very visually compelling image that conveys what I “saw” when I snapped the shutter that summer evening. The sun was just about all down, and the rocks were totally backlit. There were subtle pinks and oranges in the sky, but when I looked at the sky, I could just see silhouettes of those rock formations. Imagine how different this scene would be if I had pulled the details back into the dark shadows. Technical correctness is not always visually, or esthetically correct.
Remember that as photographers we are artists. Our photograph is supposed to conveying feelings and stimulate the viewer’s senses. Ideally, we want our viewers to be able to look at our images and feel like they were standing there next to us when we took the shot. We want them to be able to feel the exact same thing that we were feeling when we snapped our shutter. And as photographers this is always the most important component of our work. The photograph must convey the feeling that you want otherwise it is not art. It is simply a record of what we saw.
Don’t get me wrong, there is nothing wrong with simply recording images to make a visual record of our encounters. Most travel photos are just that; simply records of the places and things that we have seen.
Here are a couple of images that I have posted that should give you examples of what I’m talking about with technical correctness versus artistic accuracy.


If your goal is to be an artist, then you want that travel photo to be able to convey what you were feeling when you took the shot. And to do this you must have an understanding of the technical science behind processing that photographic image and its interplay with the visual artistic design of the photo. One is not more or less important than the other; they must work together. But remember that the technical aspect should never outweigh the design and artistic aspect .
The point that I’m trying to make here is really quite simple. As artists we always need to remember that we must give each other enough license to express ourselves in the ways in which we desire. If someone is using their digital image processing software such as Photoshop, Elements, Light Room, etc. to change and alter those recorded images into something more impressionistic and surreal, that is entirely that person’s prerogative. And if those images bring them joy and joy to others who view them, then they are successful artists. And for those of us who use the digital image processing software to more frequently adjust the tonal quality and color quality of the image, again if that brings us joy and joy to others who view our photos then we are equally successful artists. In photography as in life, there is a yin and a yang. In Taoism, the yin and the yang are inseparable and play together to make the one. This is exactly the same as the technology, or science, and design working together and building a cohesive artful, emotional image.
And in conclusion, I must say that the new technology has helped me to improve my craft and hopefully become a better photographer and artist. For me the ability to instantly see and evaluate the image qualities, and then make adjustments has been immensely helpful. Not only has the technology helped my images have more technical correctness, but it has improved my artistic approach my allowing me to quickly and easily see the changes to composition, lighting, exposures, etc.


You must be logged in to post a comment.